Table of Contents
- Introduction
- The Buttons
- The Case
- PSX Controller
- Wiring
- Led Lights
- My Thanks
- Getting the Games
- Other Tutorials
Introduction
This is yet one of those "How to build a Pop'n Music Arcade Style Controller" -tutorials. I just felt like writing one on my own when I'm building one for myself. ~_^You should treat this tutorial as a guideline, not as the absolute truth. And do not hold me responsible if something goes wrong in your own build project :P. You can only blame your lack in building skills or/and common sense.
The Buttons
I ordered my buttons from www.arcadeshop.de- 2 x Illuminated Blue Jumbo Dome Button
- 2 x Illuminated Green Jumbo Dome Button
- 2 x Illuminated Yellow Jumbo Dome Button
- 2 x Illuminated White Jumbo Dome Button
- 1 x Illuminated Red Jumbo Dome Button
- 1 x White-Green Pushbutton (not available any more, just select another one from here.)
- 1 x White-Red Pushbutton (not available any more, just select another one from here.)
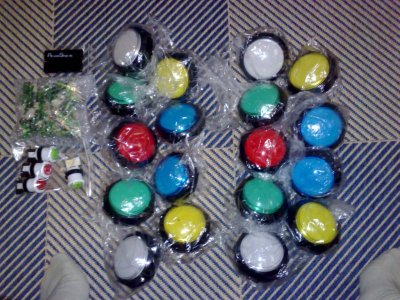
Two sets of buttons. I ordered the other one to my friend.
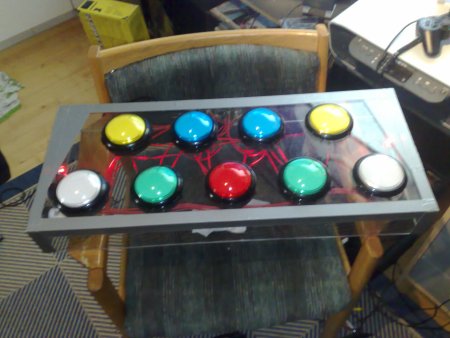
The Case
Remember that when designing the case, few inches of the button's height go inside the case. So the empty area height inside should be something about 3 inches (7,62 cm). A good thickness for the casing's building material is about 0,5 inch (1,27 cm), except the bottom plate can be quite thin, about 0,2 inch (0,5 cm) and there will be 2 plates glued together to make the top plate.And the side pieces of the box are 28,5" x 3" x 0,5" (72,39cm x 7,62cm x 1,27cm) and 11" x 3" x 0,5" (27,94cm x 7,62cm x 1,27cm). And you naturally need two of both ~_^
And here is the front plate + the measurements for the button holes. Remember that the front plate must be about 1 inch (2,54 cm) thick
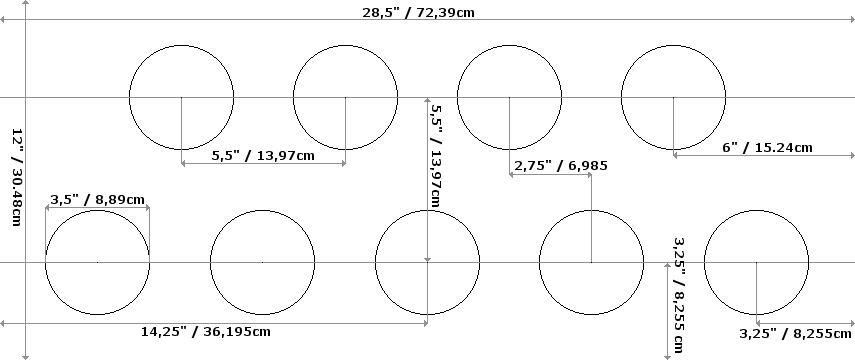
Probably the easiest way to build the front plate is to glue two plates together. But first you need to drill the holes. The upper plate must be something about 0,5 inch (1,27 cm) thick. And there you drill the 3,5 inch (8,89 cm) holes through for the buttons. Now the bottom plate doesn't have to be 0,5 inch (1,27 cm) thick. Something like 0,2 inch (0,5 cm) should be enough. And to the bottom plate, you drill the 1 inch (2,54 cm) holes trough for the buttons. And after that, just glue the plates together.
The bottom plate dimensions are the same as the front plate's. But it doesn't have to be 0,7 inch (1,77cm) thick. Something like 28,5" x 12" x 0,2" (72,39cm x 30,48cm x 0,5cm).
If you are not sure what to do and how to do it, get a handy friend to do it ~_^
Now that would've been my plan if making the case from rather cheap wood. But I decided to make a transparent one from polycarbonate. :P And let me tell you, it isn't cheap material.
If you want to make the controller easily, don't do the same as me. Just use wood like everyone else.
So that it wouldn't be so expensive, I had to make it partly a bit more thin than 0,5 inch (1,27 cm).
I decided to make the front and back side pieces thinner, about 0,2 inch (0,5cm) -> 28,5" x 3" x 0,2" (72,39cm x 7,62cm x 0,5cm). And since there wasn't 0,5 inch (1,27cm) thick plate available, I had to go with 0,4 inch (1,0cm) thick plate with the front and two other side plates. And the dimensions for the other two side pieces -> 11,6" x 3" x 0,4" (29,46cm x 7,62cm x 1,0cm).
And since the thickness of the bottom piece doesn't matter, I went with 0,04 inch (0,1cm) thick plate. If you don't want for the bottom plate to be wobbly, then a thicker one is a good idea.
One might ask why didn't I use acrylic glass to make the whole box, and my answer is that polycarbonate is a lot durable than acrylic glass.
And first, it was time to make the button holes (3,5"/8,89cm). Since drilling the holes to polycarbonate isn't actually a such good idea. Yes, we tried it... and believe us, it's easier to use a jigsaw/saber saw for the job. So drawing the outlines of the holes is a good idea ~_^.
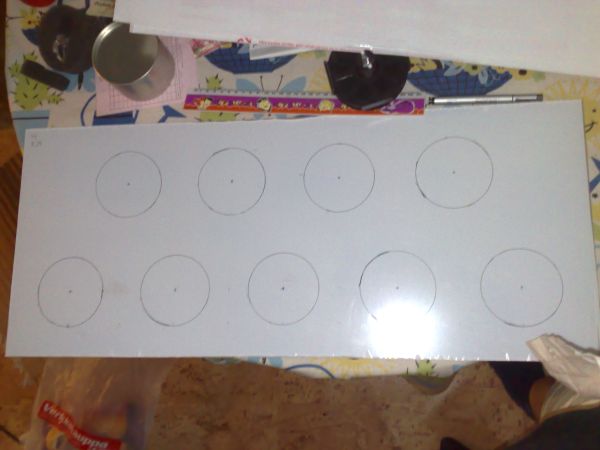
And since I don't own any tools, I went to my friend's, Amv_Nekoroms' place. And the result of it (removed the protective plastic from the plate):
Then I had to drill 1,1 inch (2,8 cm) holes to the left side plate, for start & select buttons. And then two little 0,27 inch (0,7 cm) holes for the led switches. And after that I used my hotmelt glue gun to assemble the box. Though I didn't glue the bottom since if something goes wrong, I need to be able to open it. So screws are fine for the bottom.
I had done the wiring before finishing the box.
PSX Controller
Having the buttons and the box isn't enough. We also need something to make it to work with PS2.The easiest way is to buy a cheap PSX controller (naturally), and wire the buttons to it. For the controller, I highly recommend a digital PSX controller that doesn't have any analog sticks.
A controller with analog sticks might not be recognized as Pop'n Music controller, which means the buttons are different in menus than in game.
My choice for the controller is a cheap Joytech controller.
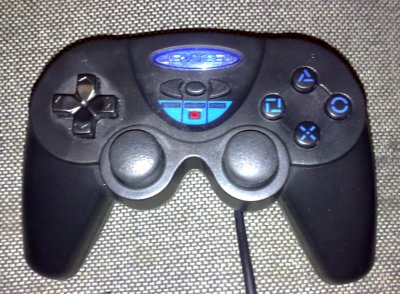
Even though it has analog sticks, it is recognized as a Pop'n Music controller (with a simple trick that is explained in the Wiring part ~_^). I recommend reading the Wiring section through before taking apart your controller.
Wiring
If your PS2 doesn't recognize the controller as Pop'n Music controller, then you need to do the following: Short the left, right and down directions in your controller. Same as the buttons would be pressed at the same time.If you want to test, if your controller is recognized as Pop'n Music controller with this trick, then press left, right and down direction buttons at the same time. If X-button represents the left blue Pop'n button and Square-button represents the right blue Pop'n button, then the controller is recognized as Pop'n Music controller.
And an image:
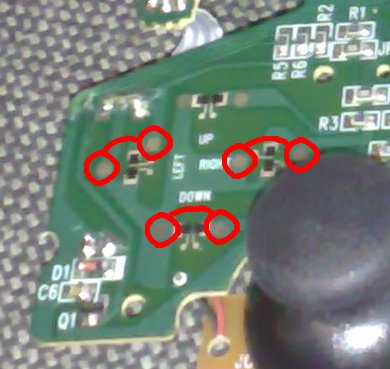
Just solder a wire to join the parts joined with red line in the image.
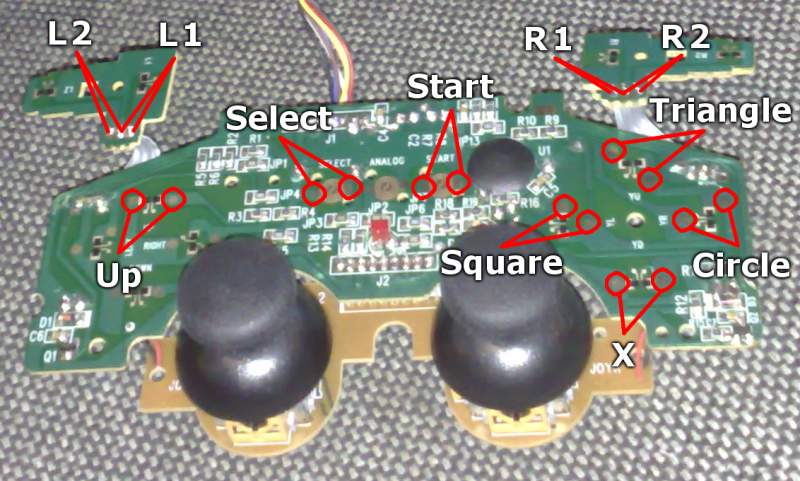
And next up is wiring the buttons. Here is where you need to wire the buttons to get them right:
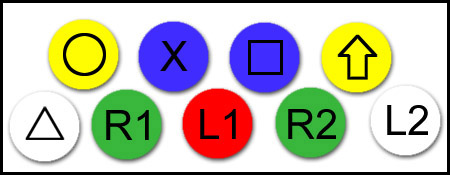
This same image is used on about every Pop'n Home Made ASC tutorial, and I have no idea who has made it. So the credit goes to whoever has made this image.
And the spots are quite easy to find from the controller. There are two metal spots where you can solder near to every button (an exception in my controller is that L1, L2 and R1, R2 have only 3 spots).
And the image of the spots ~_^
And then finally, where to put the wires in the actual button.
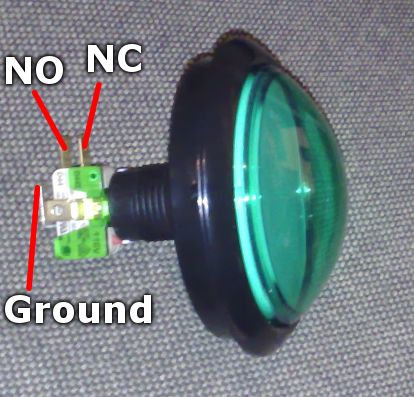
NO = Normally Open, NC = Normally Closed. Simply means, electricity will go through NC and Ground when the button isn't pressed down, and when it is pressed down, electricity goes through NO and Ground. If you still didn't get it, you connect Ground and NO. (There is no + or - since the button press is recognized when the electricity goes through)
Be careful when soldering the wires to the controller. If you heat the controller too much, the wires will go off quite easily.
Led Lights
Since I chose to make a transparent box, I thought that maybe some led lighst would look nice inside. I bought 2 bright blue and 2 bright red leds. Each only takes 20mA of power (blue is 3,25V and red is 2,2 V)."The main board in the PSX also has a surface mount 750mA fuse that will blow if you try to draw to much current through the plug (750mA is for both left, right and memory cards)" is what PSX gives, and PS2 must give at least the same, so 80mA shouldn't be too much, since it only takes 10,7% of the total mA reserved for the controllers and memory cards.
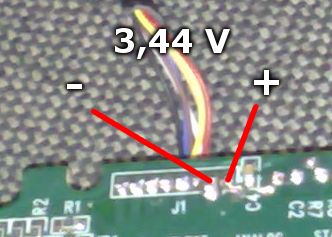
With multimeter, you can easilly find out where you can get power from. I found out two sources, but in one of them the voltage dropped drastically when I put some load (led light) to it.
The voltage might vary in different controllers, so I recommend that you measure the voltage yourself.
Now that we know the voltage and the source, we can't just wire the led lights to it. We need to add resistors to prevent the leds breaking. My friend Amv_Nekoroms found me a good site that calculates what you need. http://led.linear1.org/led.wiz
The site gave 10 ohm resistors for my blue leds and 68 ohm resistors for my red leds.
And here is how I wired the leds to my box.
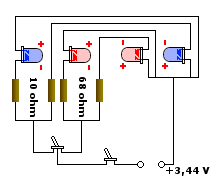
I used two switches. The first one for turining the leds on and off. And the second one for changing the color (red/blue). And I placed the leds to right and left ends of the box.
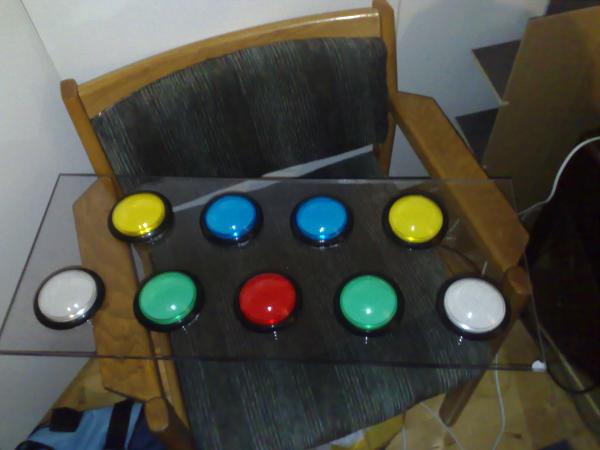
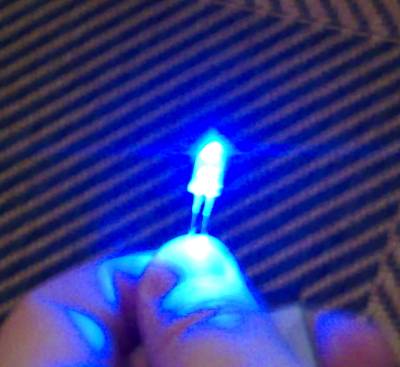
And here are the leds in action (looks a lot better in dark)
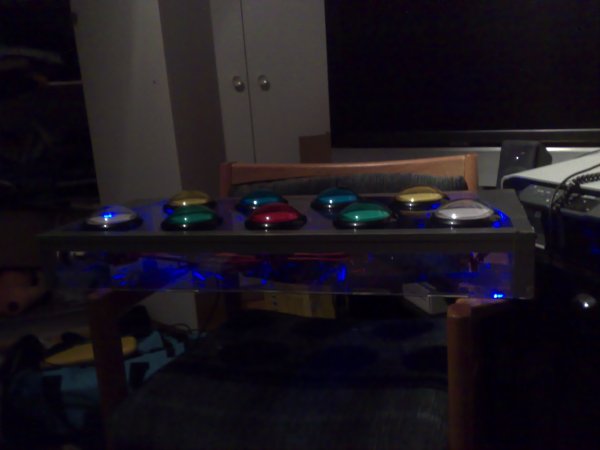
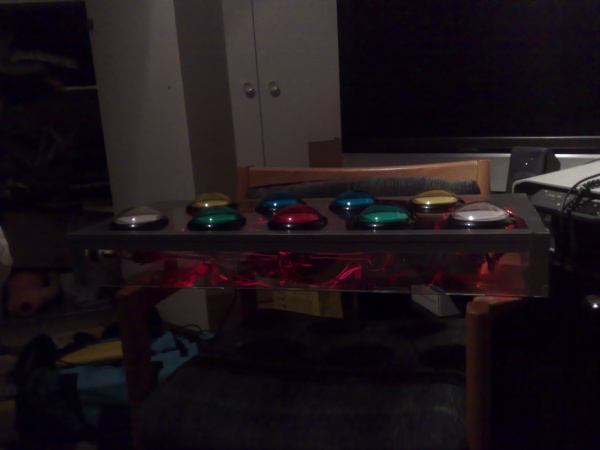
I'll try to get better pictures of the leds later
My Thanks
This project wouldn't have been possible without the help of some of my friends.- Amv_Nekoroms - selling me the controller (getting a controller suitable for this project isn't easy) and helping me to "drill" the button holes
- Denvil & Phantasm - Giving advice with the led connections
- My mom's male friend - lending his soldering tools, drill and multimeter
- arcadeshop.de. I wouldn't have any buttons without them ~_^.
- The tutorials where I got my info to make controller on my own (listed in Other Tutorials -section)
Getting the Games
Play-Asia.com is one of the most known and best places to get your copies of the games.- Pop'n Music 14 Fever
- Pop'n Music 13 Carnival
- Pop'n Music 12 Iroha
- Pop'n Music 11
- Pop'n Music 10
- Pop'n Music 9
- Pop'n Music 8
- Pop'n Music 7
A full list of Pop'n Music stuff is here